(Comments)

Disclaimer: Batch Normalization is really an optimization to help train faster, so you shouldn't think of it as a way to make your network better.
First introduced in the paper: Accelerating Deep Network Training by Reducing Internal Covariate Shift.
As the data flows through a deep network, the weights and parameters adjust those values, sometimes making the data too big or too small again - a problem the authors refer to as "internal covariate shift". By normalizing the data in each mini-batch, this problem is largely avoided. Batch Normalization normalizes each batch by both mean and variance reference.
Dense(64, use_bias=False) or Conv2D(32, (3, 3), use_bias=False)A normal Dense fully connected layer looks like this
model.add(layers.Dense(64, activation='relu'))
To make it Batch normalization enabled, we have to tell the Dense layer not using bias since it is not needed, it can save some calculation. Also, put the Activation layer after the BatchNormalization() layer
model.add(layers.Dense(64, use_bias=False))
model.add(layers.BatchNormalization())
model.add(Activation("relu"))
A normal Keras Conv2D layer can be defined as
model.add(layers.Conv2D(64, (3, 3), activation='relu'))
Turing it to Batch normalized Conv2D layer, we add the BatchNormalization() layer similar to Dense layer above
model.add(layers.Conv2D(64, (3, 3), use_bias=False))
model.add(layers.BatchNormalization())
model.add(layers.Activation("relu"))
Normally the model needs to be complicated enough so that the training could get noticeable benefit from batch normalization.
For demo purpose, we choose the MNIST handwritten digits datasets since
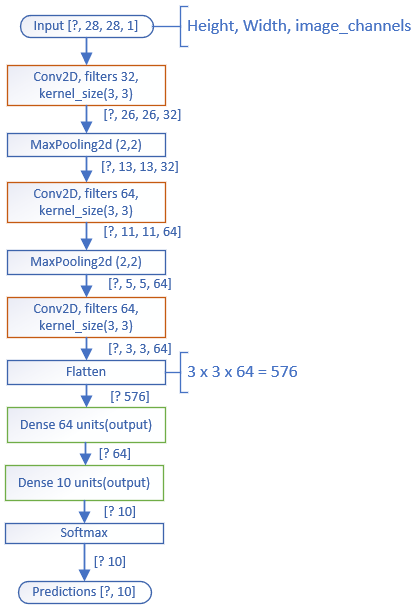
Here is the simple model structure with 3 stacked Conv2D layers to extract features from handwritten digits image. Flatten the data from 3 dimensions to 1 dimension, followed by two Dense layers to generate the final classification results.
We will apply batch normalization for all Dense and Conv2D layers and compare the results with the original model.

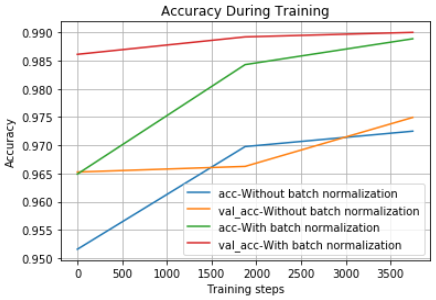
We are training models with different parameters and compare two side by side
train_and_test(learning_rate=0.001, activation='sigmoid', epochs=3, steps_per_epoch=1875)

As we can see the validation accuracy curve for the model with batch normalization is slightly above original model without batch normalization.
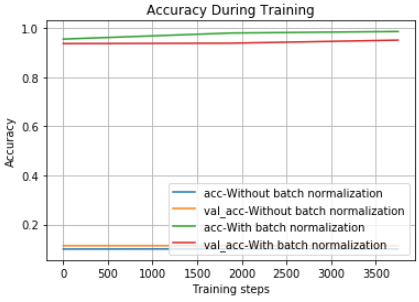
Let's try training both models with 10 times larger learning rate,
train_and_test(learning_rate=0.01, activation='sigmoid', epochs=3, steps_per_epoch=1875)

The original model without batch normalization was not able to learn at all with this learning rate.
What if we use the non-linear relu activation function instead with the same x10 learning rate,
train_and_test(learning_rate=0.01, activation='relu', epochs=3, steps_per_epoch=1875)

Finally, the original model without batch normalization is able to train, while our model with batch normalization is superior with higher validation accuracy during training.
This post demonstrates how easy it is to apply batch normalization to an existing Keras model and showed some training results comparing two models with and without batch normalization. Remarkably, the batch normalization works well with relative larger learning rate.
One final note, the batch normalization treats training and testing differently but it is handled automatically in Keras so you don't have to worry about it.
Check out the source code for this post on my GitHub repo.
The paper Recurrent Batch Normalization
For Tensorflow demo - it shows you the training and testing difference
Implementing Batch Normalization in Tensorflow
Share on Twitter Share on Facebook
Comments