(Comments)
In the tutorial, we are going to build a python GUI that automatically types.
My initial use case is for server setup with noVNC/QEMU terminal where copy paste is not available. Check out the YouTube demo here.
With the Auto Switch function on. You type something into the bottom text box and click the send button.
The App depend on two libraries
pyautogui for simulating keyboard and mouse as well as visually locate windows on the screen
wx is the Python front user interface library.
We install them with Python 3 pip3 command.
pip3 install pyautogui wx
Clone or download the source code from my GitHub.
Once you have the dependencies installed and source code downloaded. Open a terminal window in the TypeApp folder and type.
python3 type_app.py
The first thing we need is an image feature of the VNC windows we are going to type in. Let's capture a screenshot of it and save it as a png file. The tool will later locate this image on your screen and do a single mouse click to switch to this window for you.
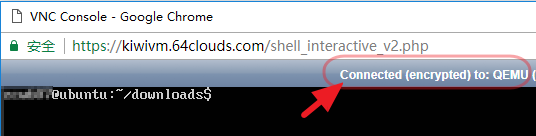
Here is an example screenshot of my browser VNC window.

Captured from this window
In the App you can choose your image by clicking the Browse button, also be sure to check the Auto Switch check box.

Before we are trying to type something into the "Input" text box, be sure the VNC browser window is visible on the main screen (if you are using multiple monitors).
In order to keep our GUI responsive, we should avoid running any computation intensive or any action take a quite a while in the main GUI thread.
In our case the action takes a while to complete is the typing action. We are going to execute it in another thread parallel to the GUI thread. But how does the second typing thread notify the GUI thread when the typing is done or failed? Here is where the wx event type comes into play.
First, we create an instance of the NewEventType, it will be used to create an event object.
Custom event class TypingEvent will be used to send an event from the typing thread to the main GUI thread.
myEVT_TYPE = wx.NewEventType()
EVT_TYPE = wx.PyEventBinder(myEVT_TYPE, 1)

class TypingEvent(wx.PyCommandEvent):
    """Event to signal that typing is done"""
    def __init__(self, etype, eid, value=None):
        """Creates the event object"""
        wx.PyCommandEvent.__init__(self, etype, eid)
        self._value = value

    def get_value(self):
        """Returns the value from the event.
        @return: the value of this event

        """
        return self._value
Define the typing thread where we will be running our typing code in. At the end of the run method, the thread will generate an event to tell the GUI the typing is finished.
class TypingThread(threading.Thread):
    def __init__(self, parent, value):
        """
                @param parent: The gui object that should recieve the value
                @param value: value to 'type' to
                """
        threading.Thread.__init__(self)
        self._parent = parent
        self._value = value

    def run(self):
        """Overrides Thread.run. Don't call this directly its called internally
        when you call Thread.start().
        """
        time.sleep(0.5)  # our simulated calculation time
        if isinstance(self._value, TypePara):
            cmd = self._value.cmd
            img = self._value.img
            # Typing code
            # . . . .
            evt = TypingEvent(myEVT_TYPE, -1, evt_value)
            wx.PostEvent(self._parent, evt)
Start the thread from the GUI thread when the "Send" click.
worker = TypingThread(self.main_view, TypePara(cmd, img_path))
worker.start()
In the GUI thread listening to the event by "Binding" a "listener" to it, the on_type_over will be called on GUI thread every time the TypingThread posts an event.
self.main_view.Bind(EVT_TYPE, self.on_type_over)

def on_type_over(self, evt):
    evt_value = evt.get_value()
    if evt_value:
        print("Done Typing \"{}\"".format(evt_value))
    else:
        pyautogui.alert('Please move the window \"feature\" to current screen and try again.')
    self.main_view.sent_enable(True)
pyautogui.position read the current mouse position on the screen.
pyautogui.locateCenterOnScreen takes our screenshot image as an argument and return the coordinate of the image on the screen
pyautogui.click as its name suggest, click the left mouse button on the coordinate found in previous step
pyautogui.typewrite types the text
pyautogui.moveTo moves the mouse back to it is used to be.
done_typing = False
if img is not None and os.path.exists(img):
    last_coordinate = pyautogui.position()
    coordinate = pyautogui.locateCenterOnScreen(img)
    if coordinate is not None:
        x, y = coordinate
        pyautogui.click(x=x, y=y, clicks=1, button='left')
        pyautogui.typewrite(cmd, interval=0.01)
        done_typing = True
        pyautogui.moveTo(last_coordinate[0], last_coordinate[1], duration=.1)

Comments